 |
How can I edit artwork on my audio files?
Home > How to use tips > How can I edit artwork on my audio files?
The some audio files can have the attached pictures: artwork / cover art.
- Run Mp3 Tag Assistant Professional and add your audio files to the Selection List. Read more...
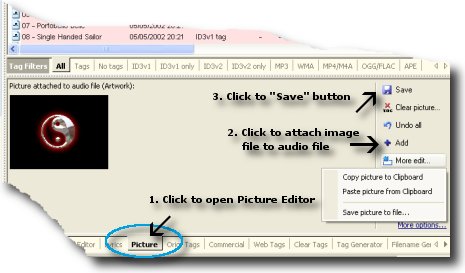
- Click on the tab "Picture" or click the "Picture" button on the toolbar for open "Picture Editor" (see Figure 1).
- Click on the "Add" button and select picture file. Mp3 Tag Assistant Professional supports BMP, JPEG and PNG picture files only.
- Press "Save" button (see Figure 1) for saving selected artwork to the audio file.
Attention! You must use ID3v2 tag for adding artwork to your MP3 files.
Hint: you can add different pictures for different audio files and save all artworks at once.
 Figure 1. Edit artwork attached to audio file Figure 1. Edit artwork attached to audio file
The other artwork features
- Paste artwork
You can paste artwork from clipboard.
For this use the feature "Paste picture from clipboard" on the "Picture Editor" menu (see Figure 1). You can copy artwork to clipboard too.
- Save artwork
You can save existent artwork to the picture file.
For this click the "More edit" button and select "Save picture to file" menu item.
- Clear artwork
You can clear the all artworks from your audio files.
Select the necessary files on Selection List and click the "Clear picture" button. Press the "Save to Files" button for clear artworks from the files.
See also
© April 29, 2008 by AssistantTools.com. All rights reserved.
|
 |
 |
 |
 |
How to Use |
 |
| | |
 |
Articles |
 |
| | |
 |  |
![[an error occurred while processing this directive]](http://www.assistanttools.com/images/logo.jpg)
![[an error occurred while processing this directive]](http://www.assistanttools.com/images/top.jpg)
![[an error occurred while processing this directive]](http://www.assistanttools.com/images/logo.jpg)
![[an error occurred while processing this directive]](http://www.assistanttools.com/images/top.jpg)


